
A versatile tool that simplifies online selling for businesses worldwide, including SMEs and entrepreneurs, Payment Links eliminate the complexities of traditional website setups. Users can effortlessly create and customize complete payment pages, enabling seamless sharing and direct customer interaction. This tool allows users to configure pricing, billing options, and branding elements, facilitating secure and efficient payments without needing a traditional e-commerce platform. Additionally, the introduction of coupon codes enhances flexibility and promotional capabilities, allowing businesses to offer discounts and incentives to customers with ease.
Utilizing Payment Links:
- Access the Payments Section: Log in to Captivation Hub platform and navigate to the Payments section from the main dashboard.
- Find Payment Links Feature: Once in the Payments section, locate the Payment Links feature.
- Initiate Creation Process: Click on the Payment Links feature to begin creating a new payment link for your products or services.
- Configure Payment Link Settings: Within the Payment Links interface, you'll have the option to configure various settings to tailor the payment link according to your specific requirements. This includes:
- Product Selection: Choose the product or service for which you want to create the payment link.
- Pricing: Set the pricing for your product or service, including options for one-time purchases or recurring subscriptions.
- Billing Frequency: Specify the billing frequency, such as monthly, weekly, or custom intervals, for recurring payments if applicable.
- Additional Settings: Explore additional settings that may be available, such as statement descriptors, trial periods, or membership offers, depending on your business needs.
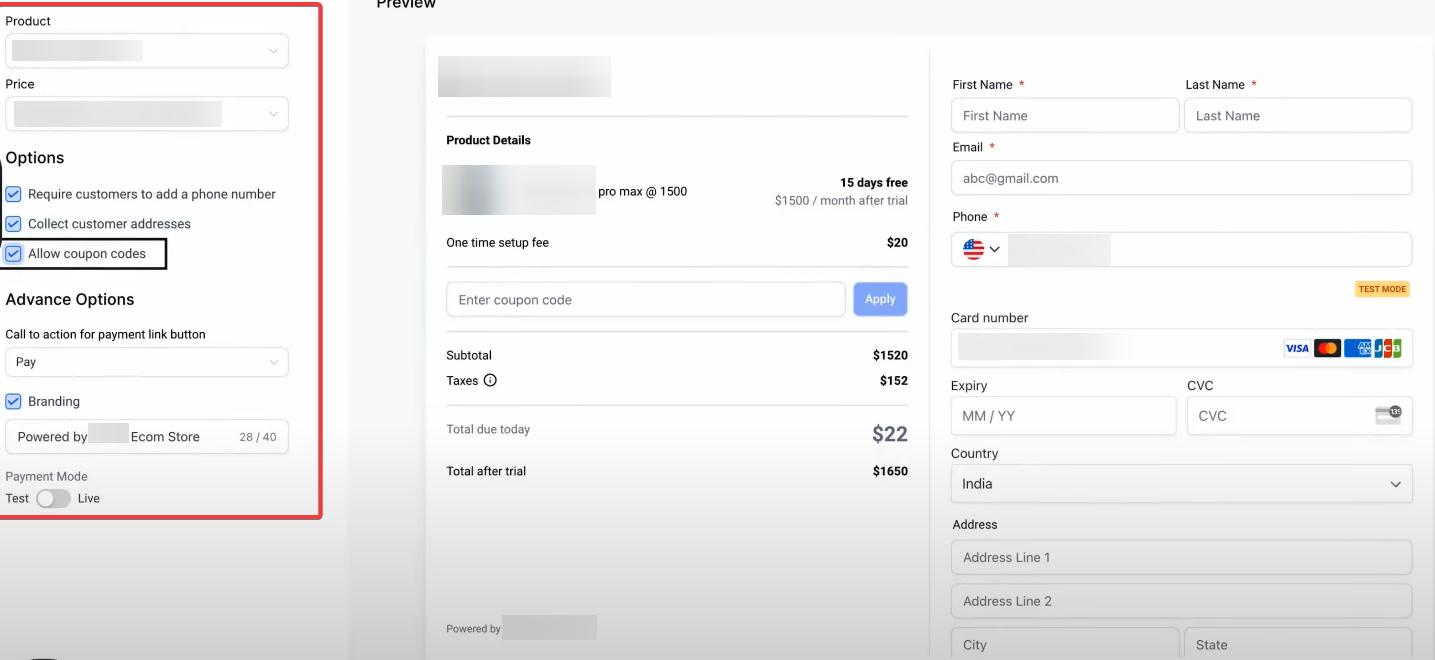
- Customize Payment Link: Customize the appearance and functionality of the payment link to align with your brand and preferences. This may include branding elements, button text, and other visual or textual customization options.
- Preview Payment Link: Before finalizing, take advantage of the preview feature on the right side of the menu to review how the payment link will appear to customers.
- Save and Activate Payment Link: Once satisfied with the configuration, save the payment link and activate it to make it live and accessible to customers.
- Share Payment Link: After activation, you can share the payment link directly with your customers via email, text message, social media, or any other preferred communication channel.
How to Create Product Payment Links
The capability to create and customize payment links for products and services, empowers users to configure pricing, billing options, and branding elements, making it easier to facilitate secure and efficient payments without the need for a traditional e-commerce platform.
Here's a step-by-step guide to help you get started:
- Access Product Creation Section: Navigate to the product creation section in your Captivation Hub account.
- Set Up Product Details: Provide essential information about your product or service, including title, description, and product type (e.g., physical goods, digital product, service).
- Configure Pricing Options: Choose between one-time payments or recurring subscriptions and set the price accordingly. Optionally, include a compare-at price to display discounts.
- Customize Additional Options: Explore settings such as billing frequency, trial periods, and inventory tracking to align with your business needs.
- Sync with Payment Platforms: Ensure seamless integration by syncing product details with supported payment platforms like Stripe or PayPal.
- Create a New Payment Link: Select the product, and pricing details should automatically populate for a new payment link.
- Customize Payment Link Settings: Enhance user experience and branding by configuring options such as call-to-action buttons, payment modes, and branding elements.
- Finalize and Test the Payment Link: Review and preview the payment link to ensure accuracy and functionality before saving.
- Share the Payment Link: Copy the generated link and share it with customers via email, text message, or social media for easy access to the payment page.
Coupon Codes for Payment Links:
The introduction of coupon codes for payment links enhances the flexibility and promotional capabilities of the platform, allowing businesses to offer discounts and incentives to customers. With this feature, users can easily apply coupon codes to their payment links, providing a seamless experience for both businesses and customers.
How to Use Coupon Codes:
- Navigate to the payment link creation section within the platform.
- While setting up the payment link, locate the option to include coupon codes.
- Check the corresponding box to enable coupon code functionality.
- Input the desired coupon code into the designated field.
- Save the settings to apply the coupon code to the payment link.
Customers can then use the provided coupon code during checkout to avail of discounts or incentives associated with the payment link.
Comments
0 comments
Article is closed for comments.