
Transferring your domain into Captivation Hub lets you manage registration, renewal, DNS, and product connections (email, sites, client portals) all in one place. This guide covers the full transfer-in workflow, including eligibility, step-by-step instructions, and troubleshooting.
Note: Domain transfer-in may not be enabled on all accounts. If you do not see the option for domain transfer, please contact support to have it enabled.
What is Domain Transfer-In?
Domain Transfer-In is a built-in Captivation Hub feature that allows users to move domain ownership and management from third-party registrars (such as GoDaddy, Namecheap, etc.) into the Captivation Hub platform. This simplifies your workflow by letting you purchase, transfer, renew, and manage DNS records from within your account. The Domains page acts as your centralized dashboard for all domain activity, improving visibility and control.
When you initiate a domain transfer-in, Captivation Hub guides you through a 5-step process — starting with domain entry and ending with approval from your current registrar. The system automatically checks transfer eligibility, allows DNS record import or review, and ensures a secure finalization using an EPP (authorization) code. Once complete, the transferred domain integrates instantly with your websites, funnels, client portals, and email systems — all within Captivation Hub.
Key Benefits of Domain Transfer-In
- Centralized control: Manage domains, DNS, billing, and renewals alongside websites, funnels, and email tools in Captivation Hub.
- Security & flexibility: Full DNS access within Captivation Hub — no external registrar logins needed.
- No lost term: Existing remaining term carries over, and +1 year is added at transfer (TLD exceptions may apply).
- Transparent pricing: Fixed, upfront transfer fees for clarity.
- Smooth integrations: Instantly connect transferred domains to Captivation Hub products.
Setup & Prerequisites
Before you start, confirm that your domain meets industry requirements and is ready for transfer:
- Domain is older than 60 days (ICANN rule).
- Domain is unlocked at your current registrar.
- WHOIS privacy protection is turned off.
- DNSSEC (if enabled) is disabled.
- You have access to the EPP/Auth code from your registrar.
- Your contact email is correct in WHOIS, since transfer approval emails will be sent there.
- Your Captivation Hub wallet has sufficient funds for the transfer.
- We recommend saving a copy of your current DNS settings.
How to Use the Domain Transfer-In Feature
Step 1: Start Transfer
In your account, click on Settings.
Go to Domains & URL Redirects > Domains.
- If the domain already exists as external, click Transfer-In.
- To transfer a new domain, click the Transfer-In Domain button.
- Or click on the Purchase/Transfer Domain button.
Enter the domain name you want to transfer and click the Continue button.
Step 2: Eligibility Check
The system runs an eligibility check to confirm ICANN requirements. If the domain is eligible for transfer you can continue with the transfer process.
During the Eligibility Check, Captivation Hub verifies whether your domain qualifies to be transferred into the platform. The system evaluates both registrar-level rules and technical readiness. When a domain is eligible for transfer you can see the:
- Domain Name
- Current Domain Registrar
- Current expiration and new expiration (extended by 1 year)
- Applicable fee for the extension of expiry date
Make sure you have access to your current registrar before proceeding.
A domain is not eligible for transfer when:
- Its current registrar is not supported.
- It has been previously purchased internally.
- Its TLD is not supported.
- It has been purchased or transferred in the last 60 days.
- It has an EPP status that does not allow for transfers (e.g., pendingDelete, redemptionPeriod, serverHold).
- The transfer would result in the domain term exceeding the maximum allowed term.
- Domain extension is not supported.
In these cases, the Continue button will be disabled and a relevant error message will explain why the domain cannot be transferred at this time.
Step 3: Review and Save DNS Records
Note: Before transferring your domain (e.g., from GoDaddy or Namecheap), review and replicate all DNS records from your current provider. This prevents downtime for your website, email, and other services.
You can choose between two methods to retrieve your DNS records:
Note: Your domain registrar and DNS provider can be different if you've changed the nameservers where you bought your domain. For example, if you bought your domain on GoDaddy but pointed it to Cloudflare by updating the nameservers, then Cloudflare is now managing your DNS. In that case, you'll need to log in to Cloudflare to access your DNS records (zone file).
1. Upload DNS Zone File
This method is recommended if you want to import all DNS records from your current DNS provider without missing any existing records. This file contains all your domain's DNS entries including A, CNAME, TXT, MX, and other record types.
To get the DNS Zone file from your current DNS provider:
- Log into your current DNS provider or where you purchased your domain.
- Go to DNS settings for the domain you want to transfer.
- Locate the option to export the DNS zone/records file.
- If you can't find this option, reach out to your current DNS provider or registrar's support.
Note: Go to your registrar below to follow the step-by-step process:
- GoDaddy — Learn how to export zone files from GoDaddy
- Cloudflare — Learn how to import and export DNS records in Cloudflare
- NameCheap — Currently, Namecheap does not offer a downloadable zone file, so you may need to recreate records manually or follow these steps to manually extract the records.
- IONOS — Domain Exports, Cloud DNS, API How-Tos
2. Auto Scan DNS Records
Note: Your domain registrar and DNS provider can be different if you've updated the nameserver records at your registrar. For example, if you purchased your domain from GoDaddy but pointed it to Cloudflare by changing the nameservers, then Cloudflare becomes your DNS provider. In that case, you'll need to log in to Cloudflare to view and compare your DNS records.
This method is convenient and requires no prior setup. Your existing DNS records will be automatically scanned, but some records may not be detected. To avoid interruptions to existing connected services (funnels, websites, etc.) after transfer, it is highly recommended to manually cross-check the scanned records with your records at your current DNS provider or registrar and add/edit records if required.
Reviewing DNS Records
Note: Manually cross-check scanned DNS records against those at your DNS host/registrar. Missing entries can cause website or email outages after transfer — review and add any that weren't captured.
Once records are retrieved, you can review your DNS records. In the DNS table shown you can:
- View all DNS entries in a table format, categorized by record type (e.g., A, CNAME, TXT, MX).
- Add new records by clicking Add Record.
- Edit or delete individual records as needed.
- Search records using any field (name, type, value).
After reviewing, check the Confirmation box and click Continue.
Step 4: Finalize Transfer
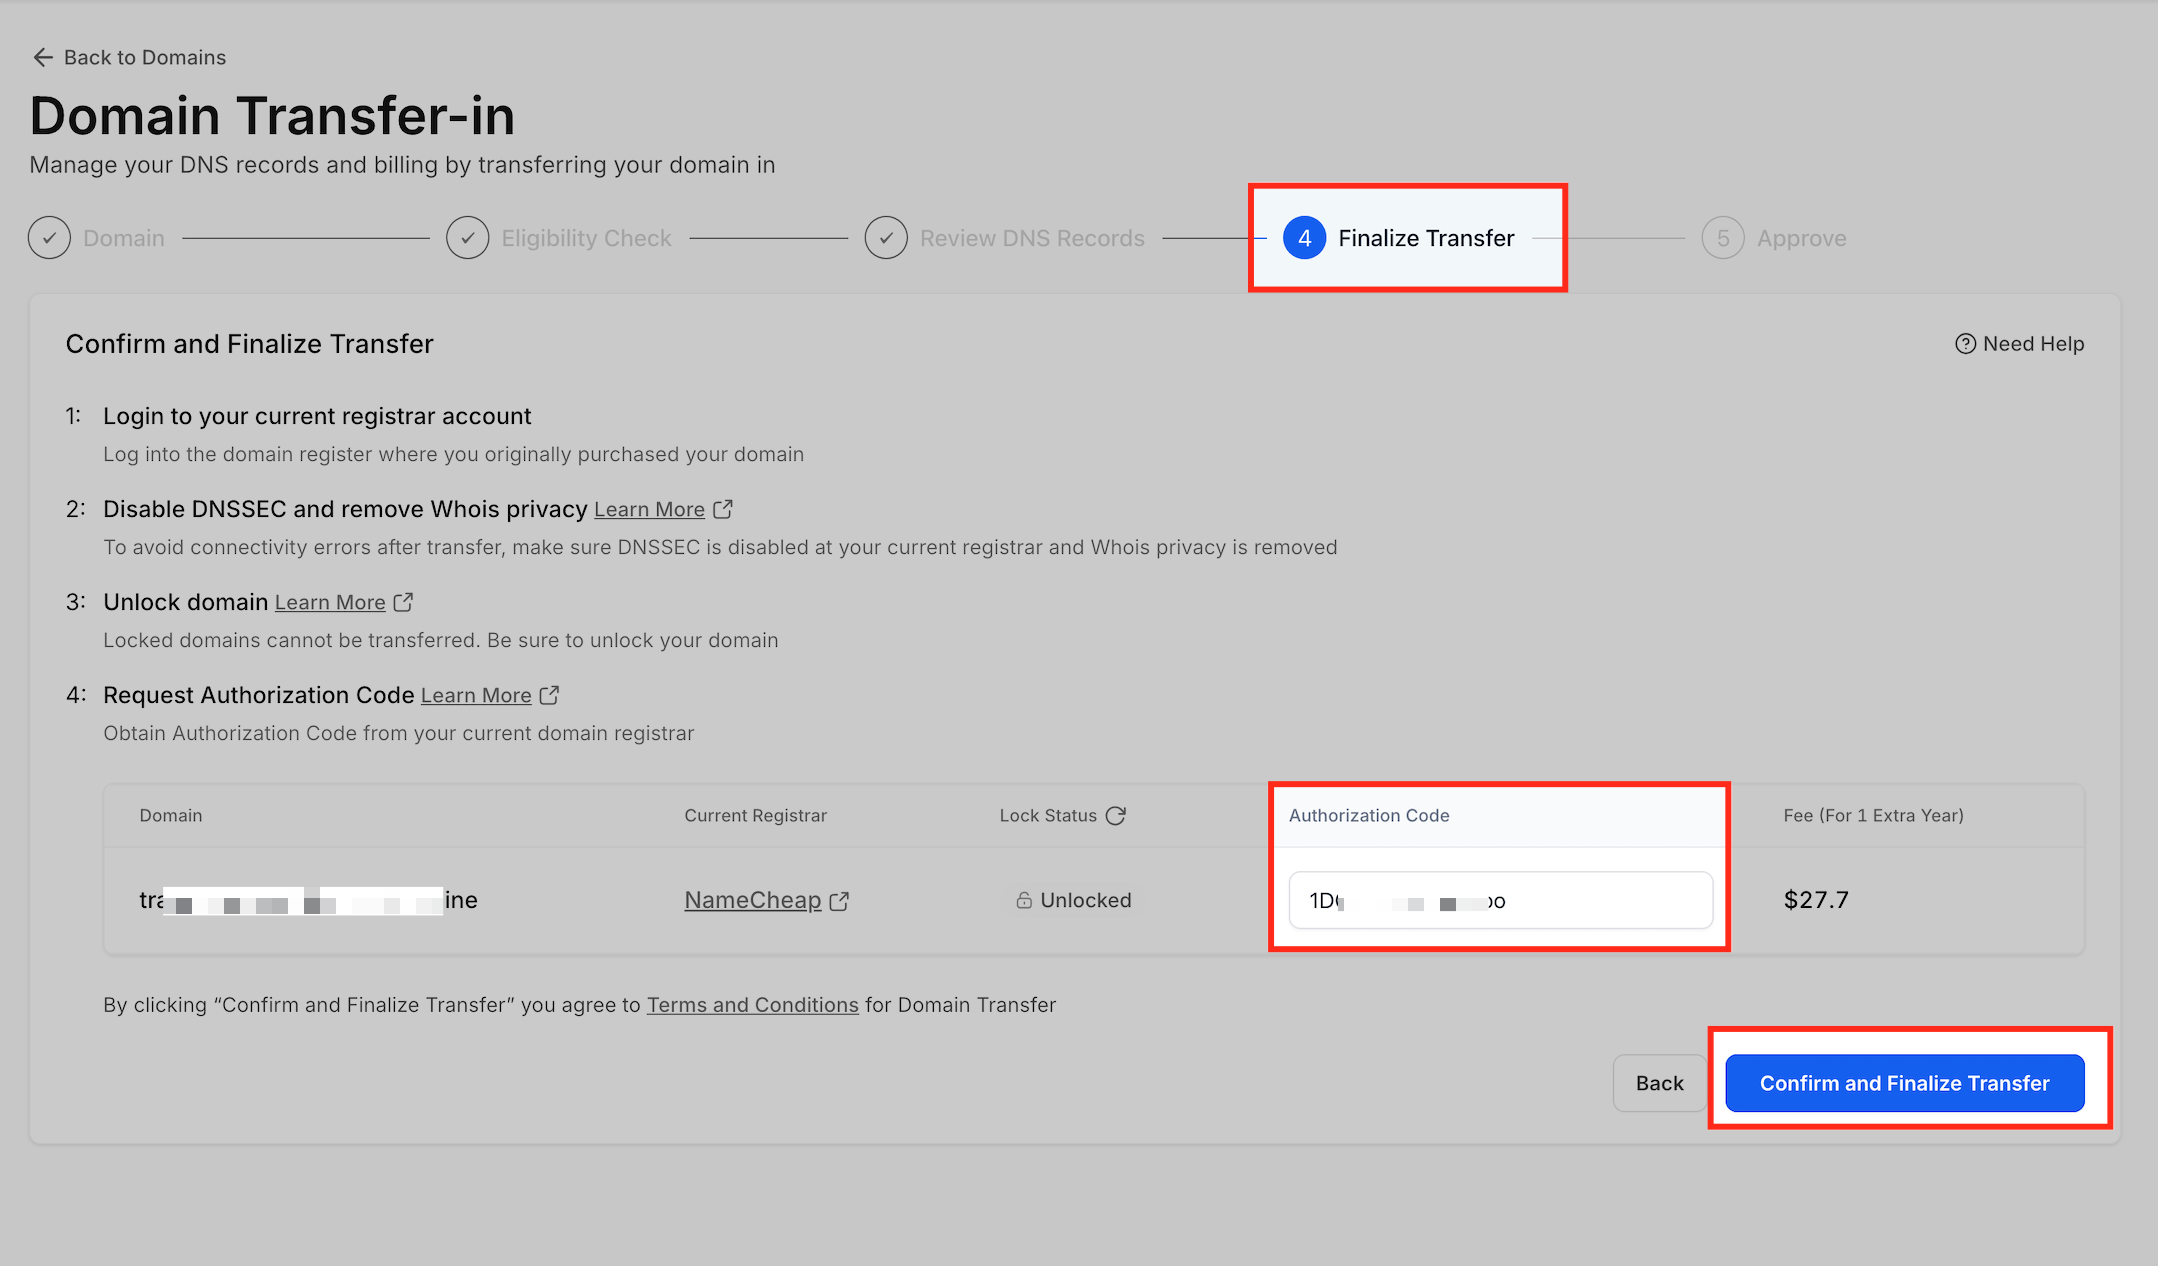
The Finalize Transfer step is where you complete the authorization process to move your domain from your current registrar to Captivation Hub. This step ensures that your domain and related services continue working smoothly after the transfer.
On the Finalize Transfer screen, you will:
Disable DNSSEC & WHOIS Privacy
Before initiating a domain transfer, it is important to disable DNSSEC and remove WHOIS privacy protection from your current registrar. General instructions (details may vary):
- Log in to your current registrar account.
- Go to DNS or Domain Settings.
- Find the option for DNSSEC and disable it.
- If WHOIS Privacy Protection is enabled, turn it off.
- Save changes.
- GoDaddy: Disabling DNSSEC and Removing WHOIS Privacy — Note: It may take a few minutes for the DNSSEC record to be fully removed. You'll see a confirmation on GoDaddy once the setting is updated.
- NameCheap: Disabling DNSSEC and Removing WHOIS Privacy
- IONOS: Disabling DNSSEC and Removing WHOIS Privacy
Unlock Your Domain and Request Authorization Code (EPP Code)
Before transferring your domain, it must be unlocked, and you'll need an authorization code (also called an EPP or transfer code) from your current registrar. General instructions (details may vary):
- Log in to your current registrar account (e.g., GoDaddy, Namecheap, IONOS).
- Go to your domain management or domain settings section.
- Look for the Domain Lock or Registrar Lock option.
- Disable or turn off the lock to unlock the domain.
- Once unlocked, locate the option to get the authorization code (may be labeled EPP code, Transfer Code, or AuthInfo).
- The code may either be displayed on screen or sent to your registered email.
- GoDaddy: Learn about transferring your domain out of GoDaddy
- Namecheap: Learn about transferring your domain out of Namecheap — Note: Make sure WhoisGuard is disabled before requesting the auth code.
- IONOS: Learn about transferring your domain out of IONOS
Submit the Transfer and Complete Payment
When you click the Confirm and Finalize Transfer button, the system will:
- Validate domain unlock status, auth code, and any other registry-level statuses.
- If the domain is valid for transfer, charge the wallet for the fee.
- Submit the transfer request.
Step 5: Approve In-Progress Transfer
Once you've submitted your domain transfer request, the final step is to approve the transfer at your current registrar. Until you do that, the transfer stays in a pending state and won't complete.
Why Approval Is Required
Domain transfers require explicit confirmation from your current registrar (such as GoDaddy, Namecheap, or IONOS) to protect against unauthorized changes. You must manually approve the transfer either through your email inbox or your registrar's dashboard.
If no action is taken, the transfer may auto-approve after 5–7 days, depending on the registrar's policy.
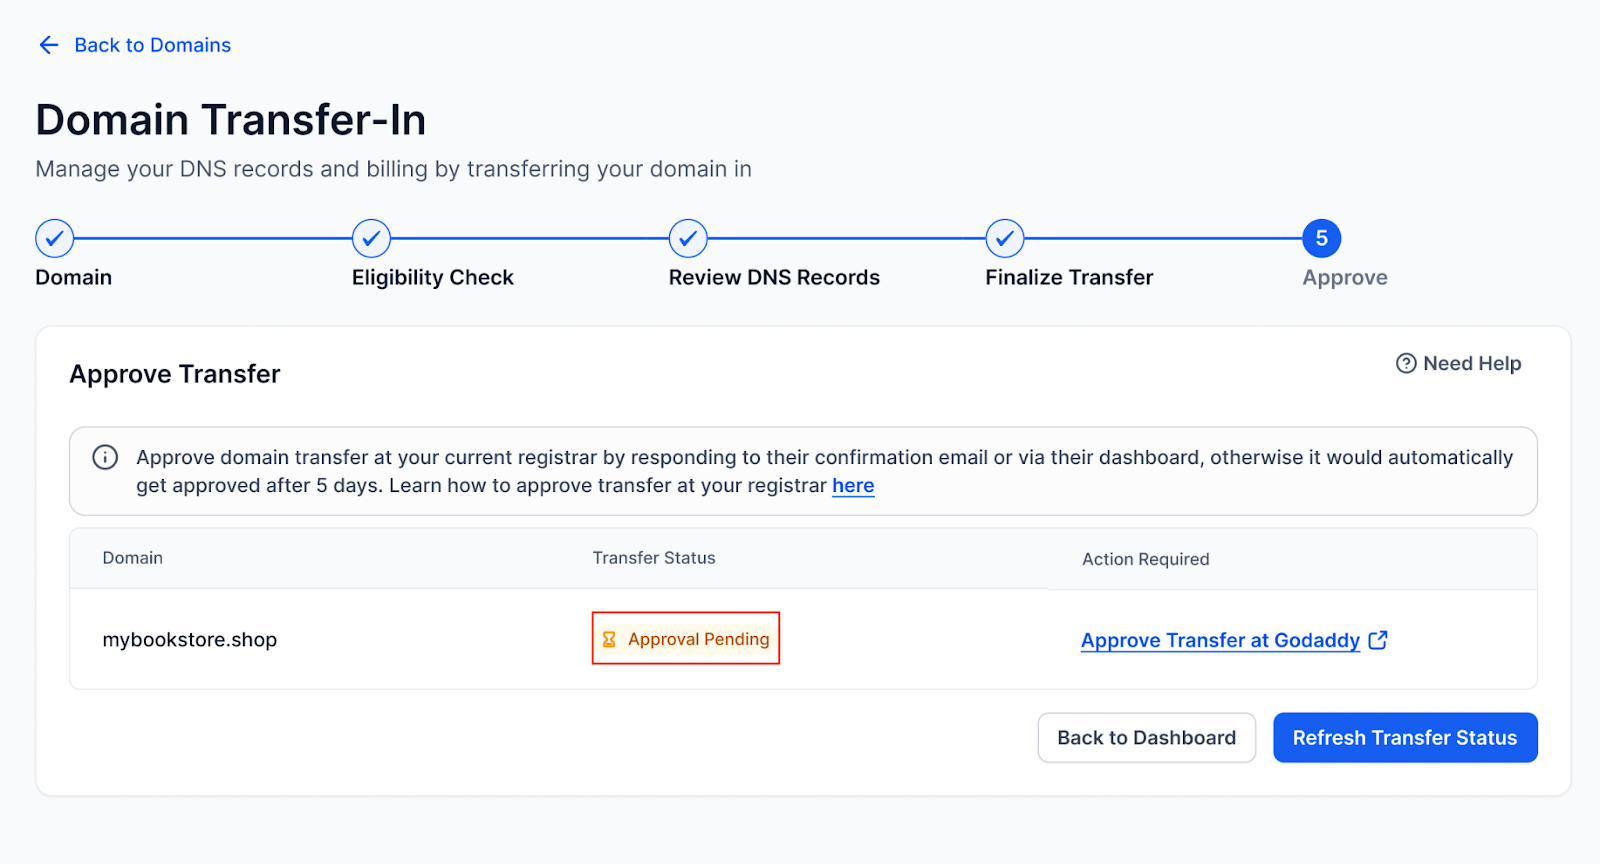
How to Approve the Transfer at Your Registrar
- GoDaddy: Option 1 — Email Approval; Option 2 — Dashboard Approval
- Namecheap: Transfer a domain out of Namecheap
- IONOS: Sign in to IONOS → Go to Domains & SSL → Click on the domain you're transferring → Look for a Pending Transfer prompt or email instructions → Approve the transfer when prompted
After Transfer Approval
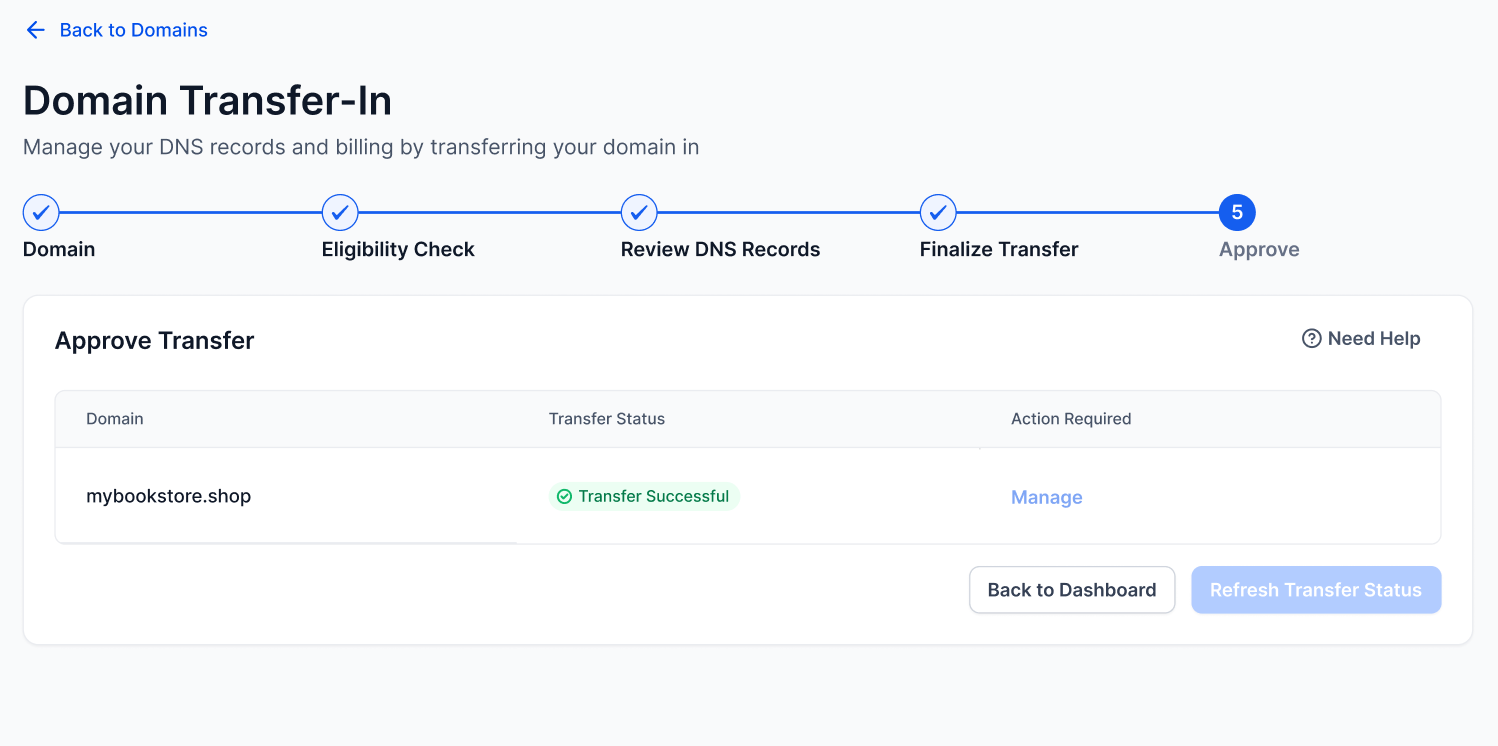
Once you approve the transfer:
- Your domain is moved under our registrar partner (Cloudflare).
- You'll see it listed under Internal Domains in your account.
- You can manage DNS, renewals, and billing right inside our platform.
- The Manage button becomes active so you can take further actions.
If the Transfer Is Rejected
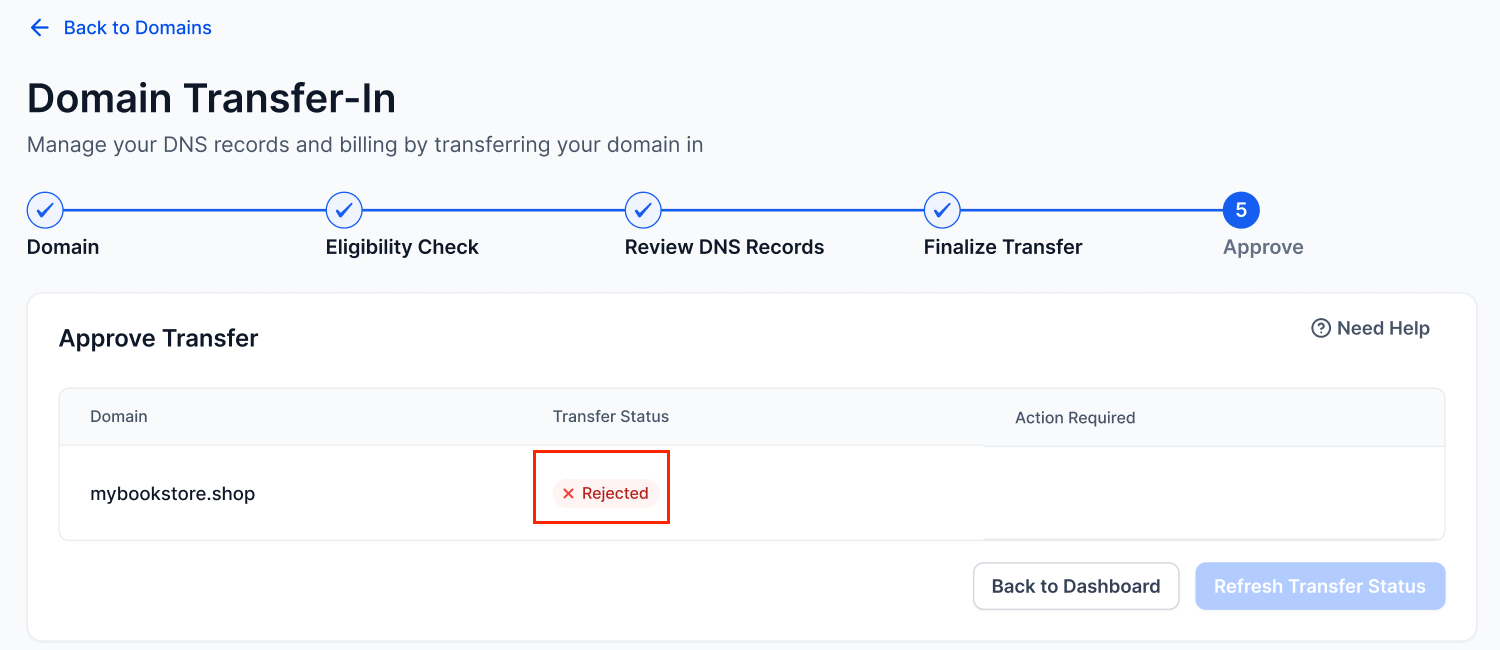
Your transfer can be rejected if:
- You manually cancel it.
- Your registrar blocks it (e.g., 60-day lock).
- You don't approve it in time.
When this happens:
- The domain status shows as Rejected.
- The Transfer to Us button reappears so you can try again.
Step 6: After the Transfer
- Verify DNS records: Make sure your domain points correctly to sites, funnels, or email.
- Reconnect products: Email sending domains, website/funnel domains, client portal or white-label login domains.
- Set up auto-renew (recommended).
Common Issues & Troubleshooting
- Auth code rejected — Double-check with registrar, request a new code.
- Transfer email not received — Verify WHOIS contact email; check spam/junk folders.
- Domain locked — Ensure registrar lock is fully removed.
- Transfer takes longer than 7 days — Some registrars delay releases; check status in your current registrar's panel.
- Website/email downtime — Verify DNS records were imported correctly.
Frequently Asked Questions
Q: How much does transferring in a domain cost?
You'll be charged for a 1-year renewal, added to your existing expiration date.
Q: Can I transfer in all domain extensions?
Most common TLDs (.com, .net, .org, etc.) are supported. Certain country-code TLDs may not be.
Q: What if I want to transfer out later?
You can unlock your domain and obtain an Auth code to transfer out to another registrar.
Q: What if some DNS records are missing after auto-scan?
Always manually cross-check the scanned records with your current DNS provider. Auto-scanning might miss some records. You can edit, delete, or add records before finalizing the transfer.
Q: What if my nameservers are managed by someone else (e.g., Cloudflare), but the domain is with GoDaddy?
Then your DNS provider is Cloudflare even if your registrar is GoDaddy. When transferring the domain, your DNS setup will still be managed at Cloudflare unless you switch nameservers post-transfer.
Q: What if my registrar and DNS provider are different?
Then you'll need to log in to your DNS provider (e.g., Cloudflare) to export or review DNS records. The registrar only holds the domain, not the DNS settings.
Q: How long does it take after I finalize the transfer?
Once submitted, transfers typically complete within 1–5 days depending on your registrar. Some domains may complete faster if approved manually.
Q: I don't see the option to unlock my domain. What should I do?
Some registrars hide this setting under "Security" or "Transfer Settings." If it's not visible, search their help center or contact their support.
Q: What if my auth code is wrong?
You'll see an error. Double-check with your registrar and make sure the domain is also unlocked.
Q: Will transferring my domain cause downtime?
Not if DNS records are accurately reviewed and migrated before the transfer. Always cross-check.
Q: Can I transfer my domain back to another registrar later?
Yes, but typically you'll need to wait 60 days after the last transfer, per ICANN rules.
Comments
0 comments
Please sign in to leave a comment.